How to Organize Your Classroom Library by Genre
Looking for classroom library organization ideas? Check out this step by step setup for 2nd and 3rd grade teachers looking to organize their classroom library by genre. Perfect for elementary teachers starting a classroom library, or updating their library system to provide student choice!

When organizing your classroom library you have so many choices to make! How do you sort your books? What types of book bins should you buy? How do you keep track of all of your books? Will your students ever put books back in the correct place? What books should you have in your library in the first place? & Where exactly are all of these books coming from? Spoiler alert: You’re buying most of them.
There are a number of options you have when it comes to setting up your classroom library. However, this is the type of library organization system I recommend because it is easy to teach and use once your books and bins are labeled (we’ll talk all about that in the step by step below). It’s also a practical way to reinforce genres, help students find books of interest quickly, and get books back in the correct bins with very little effort on your part. Win, win, win, win, win!
Organizing your classroom library by genre could be a good fit for you if:
- You want to give students control over what books they choose to read
- You are hoping to foster a love of reading by letting students self-select books
- You want to introduce students to a variety of literary genres
- You don’t mind doing some work up front to make your life easier later
- You are looking for a simple way for students to find and put back books
- You are organizing your classroom library for the first time, or are looking for a new organizational system for your library
- You just read The Book Whisperer (affiliate link) and are feeling completely inspired to create a classroom of passionate readers who will carry their love for books throughout the rest of their lives thanks to your amazing expertise as a teacher of reading! (or it just made you feel guilty about making kids choose from leveled book bins)
Organizing your library by genre might not be a great fit for you if:
- You want your classroom books organized by reading level only
- You have students choose books from leveled tubs
- You already have your classroom library organized and it’s working well for you and your students (Kudos! Tell me all about it in the comments Super Teacher.)
If you fit into the former category, then let’s get started! Here’s a step by step guide for getting your classroom library organized by genre.
Starting from scratch organizing your classroom library is a big task, so make sure you take your time and break the steps into doable pieces.
Library Organization Step #1: Get supplies ready
What materials do you need to get your classroom library organized?
Clear plastic shoe bins work great for paperback chapter books, magazine holders can be a good “book box” option for individual students, and sticky return address labels (80 per page) are perfect for labeling books (just double check to make sure you purchase the correct ink jet or laser printer option). Plastic crates or thicker plastic bins work well for picture books. Check out the Amazon recommendation page for the ones I use.
Super Teacher Tip: Crates work well for picture books because they collect only minimal dust and food scrappies at the bottom, but sometimes they give students pinched fingers. I personally like the thicker plastic bins (for aesthetics) but they need to be cleaned out often. How is there an entire bag of Fritos at the bottom of the picture book bin?! Gah!
You can find all of these items at the Classroom Library Organization section of my Amazon affiliate recommendation page.
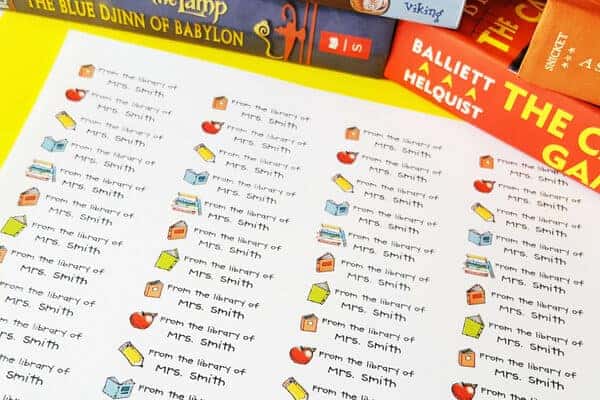
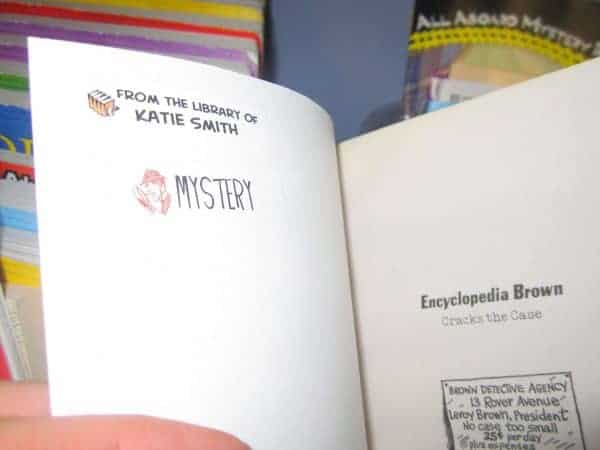
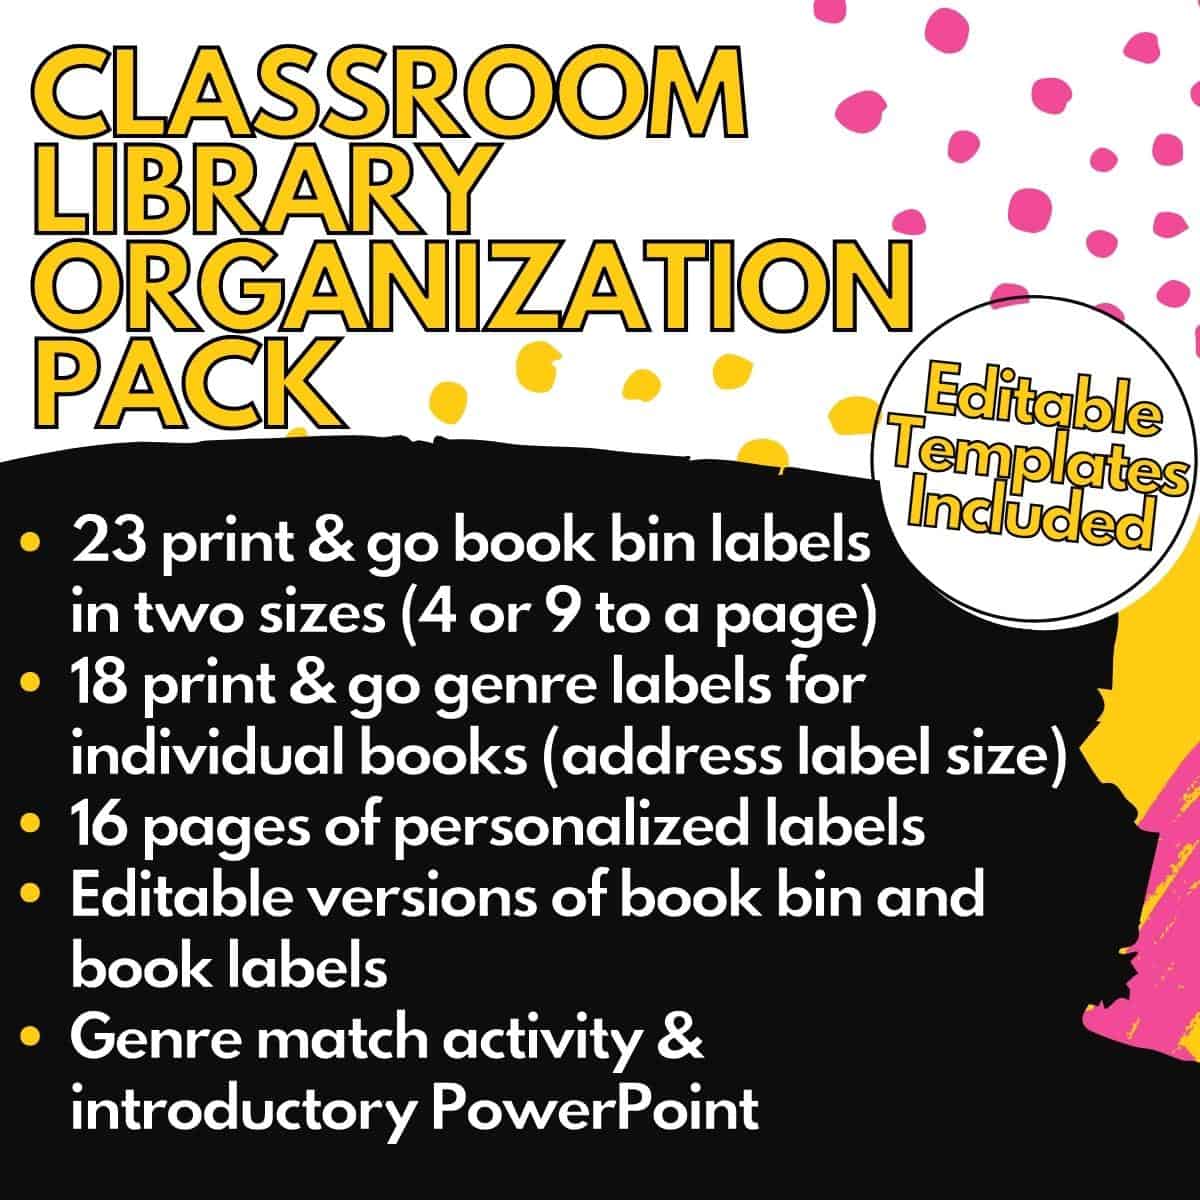
Library Organization Step #2: Label EVERY book you’ve purchased with your name
Use small (80 per page) return address labels to create personalized “From the library of Mrs. Your Name Here” labels to keep track of the books you’ve purchased yourself (see mine below). Put these sticky labels on the inside front cover of every book.
Teacher tip: Use the 0.5″x 1.75″ return address labels that come 80 to page. These are big enough to print a line or 2 of text on, but small enough to put more than 1 in a book cover. Plus, since you get so many per page, you get more for your money when purchasing a pack of them. I use Avery 8167 for ink jet or Avery 5267 for laser printers. (affiliate links)
You can format a Word document to fit virtually any type of label in the Mailings portion of the toolbar. Just choose MAILINGS, LABELS, and then OPTIONS. However, just know labels in Word do not play nice with images. (Boo!)
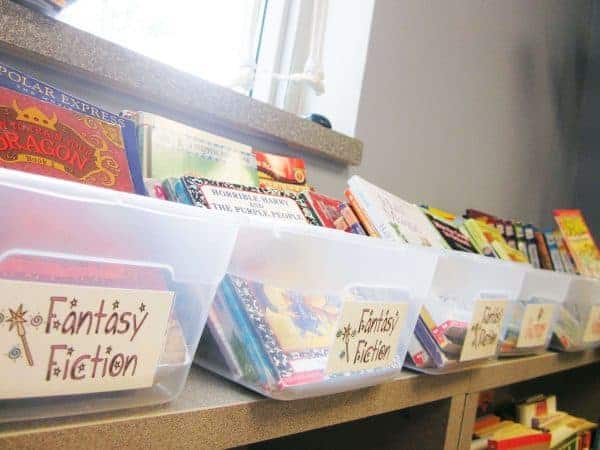
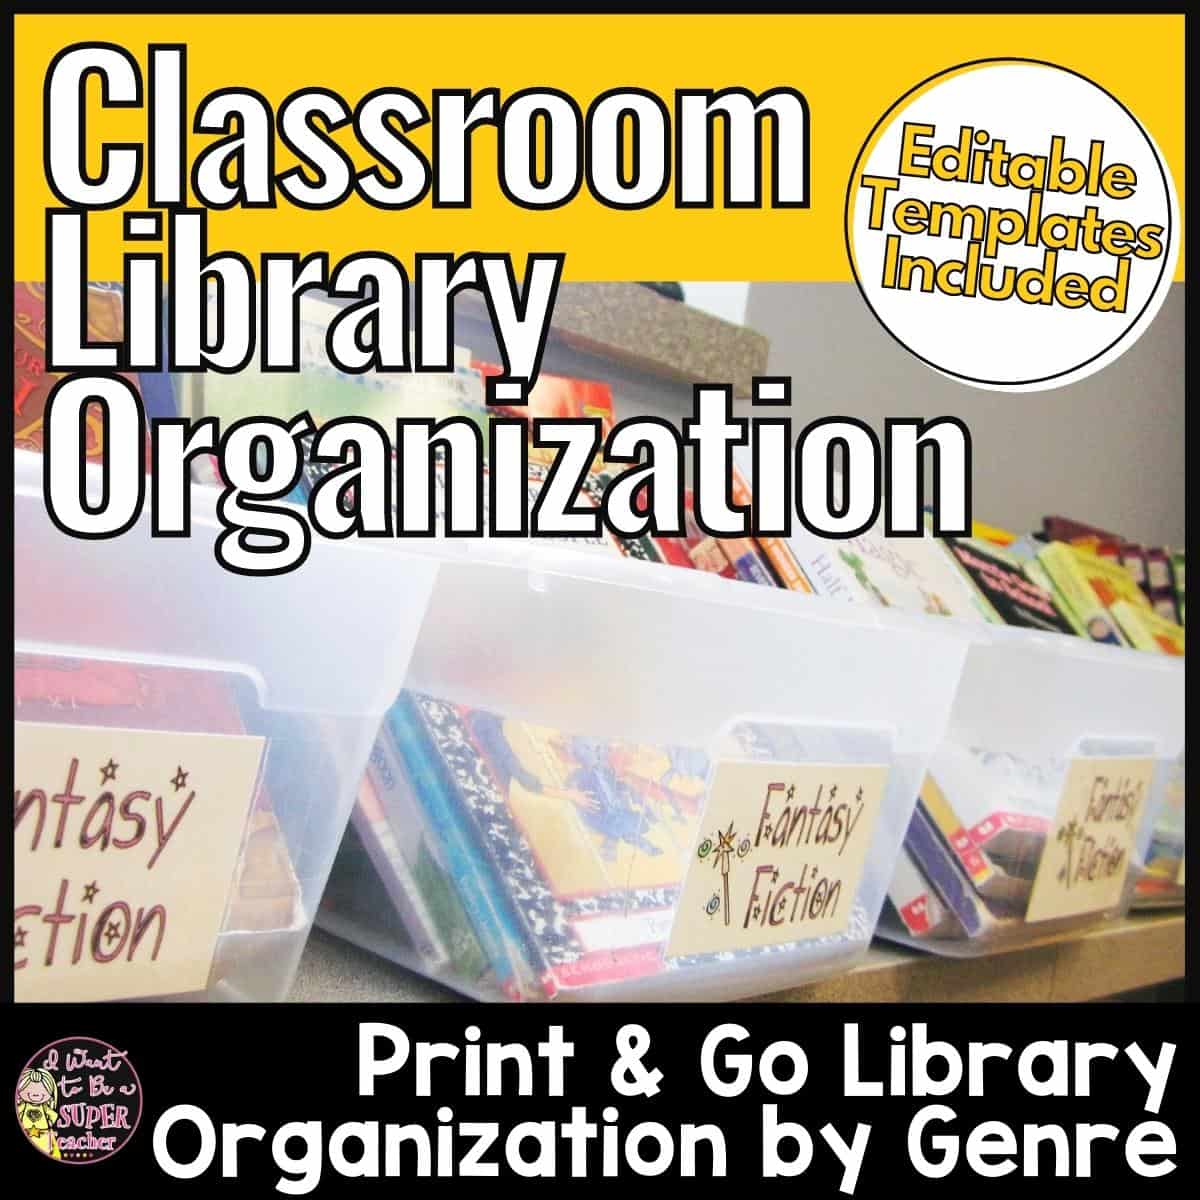
Library Organization Step #3: Label every book by genre
Now it’s time to do some sorting. This step can take some time, but don’t stress. It doesn’t have to be perfect, and you don’t have to have everything labeled before the first day of school. The one thing you do have to do is decide on a set of genres you want to use to organize your library. Start with fiction & nonfiction and go from there.
If you’re wondering where to start, here’s the list of genres I use.
Disclaimer: some of these are more “topic” than “genre”, which you can discuss with students during a reading mini-lesson. If you have kids obsessed with sports and scary stories, you’ll end up with tons of sports and scary stories books. So, why not turn these into their own book bins? One of the perks of organizing your library is not only to introduce students to different genres, but also to make it easy for them to find and put back books. You’d rather have a sports bin that’s easy to find than to put all the sports books in the realistic fiction box and then have eight-year-olds spending all morning rifling through a bin. Just put the sports books together!
- Realistic Fiction
- Fantasy Fiction
- Historical Fiction
- Science Fiction
- Mystery
- Humor
- Adventure
- Poetry
- Nonfiction (This covers procedural and informational nonfiction)
- Biography
- Traditional Literature (myths, legends, tall tales, folk tales, fairy tales)
- Animals
- Scary Stories
- Sports
- Award Winners
- Buddy Reads (perfect for Daily 5 read to someone rotations)
- Popular Series (you can label each series individually like: “Popular Series: Humphrey the Hamster” or just label all your series books with a generic “Popular Series” label)
- Picture books (Since these are large, students need to know that they go in a special larger bin. I label all picture books with the picture book + another genre label)
After you decide on the genres you want to use, then find a graphic that aligns with each genre. (simple works best)
Here are mine if you’re feeling stuck:
- Realistic Fiction (kid with glasses)
- Fantasy Fiction (magic wand)
- Historical Fiction (hourglass)
- Science Fiction (rocket ship)
- Mystery (detective)
- Humor (laughing head)
- Adventure (mountaintop)
- Poetry (feather pen)
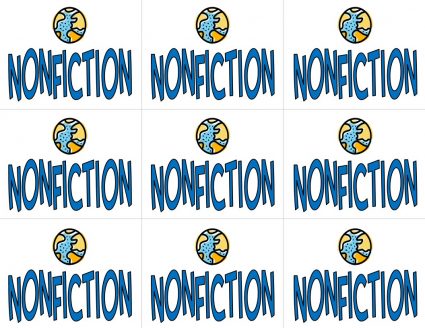
- Nonfiction (Earth)
- Biography (Abraham Lincoln)
- Traditional Literature (Tall Tales graphics)
- Animals (giraffe)
- Scary Stories (ghost)
- Sports (football)
- Award Winners (first place ribbon)
- Buddy Reads (2 kids smiling)
- Popular Series (stack of books)
- Picture books (Dressed like a Wild Thing graphics)
Now it’s time to make some sticky labels!
You can create a set of labels in Word that will match virtually any size and brands of labels. I recommend you use the same Avery 8167 or 5267 return address labels we used for creating the personalized labels in step 1. If you use the same size for two purposes, it’s one less item you need to buy. (affiliate links)
Create a set of sticky return address sized labels for every genre you chose. Use your genre graphic and words on every label. Now, put a sticky label in the cover of each book to organize it by genre.
Teacher Tip: As you create your genre labels, you might also want to think about fonts. Using a different font for every genre/topic label can also help students sort them into the correct bins. If you are a font enthusiast like me then this is one more way to give some personality to those library labels and utilize the fonts you’ve been storing up for winter. Just make sure students can read them.
If you want help sorting all the books you’ve never read, try Goodreads. After you find your book through their Search box, you will see a genre section which shows you how other people have classified the book. For example, The Calder Game by Blue Balliet, has been classified as Mystery by 200+ people and fiction by 50+ people. With this info in hand you can feel confident in slapping a “Mystery” genre sticker on the inside front cover without any more effort. Done and done!
Teacher Tip: DO NOT feel like you must label EVERY book in your classroom library before the first day of school. When you receive books from the book orders DO NOT feel like you must label EVERY SINGLE ONE before you put them in the library. Let students help. Organizing books by genre is a perfect reading mini-lesson or small group task. You can even have students work on this as center work (every student completes a written genre response with reasons for their genre pick and you use these to help you label the mystery book). It’s easy to get overwhelmed. Try not to. Let students help you with as many things as possible. It will make your life easier and make them feel empowered.
Library Organization Step #4: Label every book bin by genre
Just one more type of label to create! Now that you’ve decided on the genres you will use and have labeled a good amount of books, you can see how many book bins you will need for each genre. Make stacks of books if you need to. A typical shoe box sized plastic bin will hold 25-35 paperback chapter books.
If you don’t mind putting sticky labels on plastic bins, then you can use the same strategy for making labels as you did in Step #3. Just create a different sized label. The regular sized address labels that come 6 or 8 to a page can work well for this.
If you’re like me and have a hard time committing to placing sticky labels on plastic because you have commitment issues and despise Goo-be-gone (yuck!), then you can also create labels like the ones below in PowerPoint and print them on cardstock.
Teacher Tip: PowerPoint is way easier to use when working with graphics than Word (I know you feel me if you made your own address labels in Word!). Just change the slide size to 8.5″ x 11″ and create a table with as many rows and columns as you would like labels per page. Then use text boxes or just type in each box your genre name and add your chosen graphic.
I recommend 4 boxes per page for larger labels or 9 boxes per page for smaller labels that will fit on the shoe box sized plastic bins. Once your labels are designed, print them on cardstock and laminate them or just attach the cardstock with packing tape on your library bins.
Library Organization Step #5: Put it all together! (and keep those labels handy)
Woohoo! You did it Super Teacher!
Now all you need to do is put the labeled books in your labeled book bins and you’re ready to go! Now students will know exactly where to put books when they’re done and you have a much better chance of keeping a decently organized classroom library.
While you’re making labels for books and bins, make some extras and keep them in a “Classroom Library” folder. Then when new books are donated or purchased for your classroom, all you’ll have to do is use your pre-made labels.
Ready to get started?
* First, go grab some packs of sticky return address labels for your printer. (affiliate link)
* Then, create your “From the library of Mr./Miss/Mrs./Ms. Your Name Here” labels.
* Start thinking about your list of genres
* Start-a-labeling!
Classroom Library Organization FAQ:
Why do you recommend organizing your classroom library by genre?
Students aren’t motivated and inspired to read because of a number, they’re motivated and inspired to read because they love a type of book. If we’re trying to instill a love of reading in our students and create lifelong readers, it’s not going to happen by directing them to a leveled box. Providing your students with choice in what books they read increases their motivation and engagement. Teaching students how to quickly determine if a self-selected book is a good fit for them is a perfect mini-lesson to teach as soon as you introduce the classroom library genre system. It’s also one you’ll revisit over and over (and over!) throughout the year.
How do you manage your classroom library during the year? Do the kids really put the books back in the correct bins?
No system is perfect, but this organizational system based on matching pictures from labels in books to their corresponding book bin is by far the easiest for students that I’ve found.
One tip to keep the library as organized as possible: Make an extra library bin labeled “Reshelf”. When the school year begins, make sure “Librarian” is part of your classroom jobs or committees. This student will be tasked with making sure all books in the “Reshelf” bin are put back into the correct genre bins or books without labels are given to you.
You can also make another label for a “Book Hospital” bin. Then students will have a predesignated place to put ripped, unlabeled, or colored on (for . . . the . . . love . . .) books.
Labeling new books during the year is also an awesome mini-lesson and refresher for students on how to use your classroom library. Practice, practice, and practice again!
How do you create your labels?
The short answer:
I create the return address sized labels in Word, and the larger labels in PowerPoint.
The long answer:
Very carefully! Make sure you buy your labels BEFORE you start creating, and pay close attention to whether they’re labeled as inkjet or laser printer labels. Although all the labels with 80 per page should print the same, just a centimeter of error can cause you to have a whole lotta misaligned labels and wasted moolah. Before you print on the actual labels, you’ll want to print on draft mode on regular paper. Then hold this behind your set of labels to make sure they align as planned.
When you are creating labels in Word it can be an exercise in frustration, but you can do it! If you’re trying to put a graphic on a label, make sure you double-click on it and choose “In front of text” placement. This will give you a little more freedom in how you can move the graphic around on the page. Once you get one row of labels perfect, just copy and paste that perfect row onto all of the others. It’s doable, just frustrating.
How do I label each book’s genre if I haven’t read all the books?
Many books will be easy to sort into fantasy, realistic, or historical fiction. If in doubt, ask students to help you decide how to label the book after looking at the summary on the back, clues from the cover, and reading the first few pages. This serves as a great classroom library and genre mini-lesson during your reading block.
If you have new books or are too overwhelmed to label every book you have by genre, put students in charge. After you introduce your classroom library genres, have students work in small groups to determine the genre of a small set up books. This can also be used as a reading center during the year. Display 1-2 “Mystery Genre” books and have students decide where they should go, writing down their evidence.
Are there websites I can use to determine genres?
Yep. Try Goodreads (detailed in the post), Booksource, or Arbookfinder.
You can also check out Scholastic’s Book Wizard, but they don’t classify fictional books into subcategories, so you’re going to see a lot of “Fiction”. If you are really struggling to decide how to label a book, you can use 2 labels. Some of my science fiction books are also labeled as fantasy. I just couldn’t quite decide. You’re the teacher. Just use 2 labels.
How does this system account for leveling books? Do you also level your classroom library?
If you teach and reinforce the concept of choosing just right books, and students know you will be checking in with them during individual reading conferences or during small groups about their self-selected library books, then having every book labeled by level seems unnecessary. Plus, in my experience, students have individual book bins or book bags where they keep, not only self-selected classroom library books, but also books from reading groups which are typically chosen by you.
What do I do if students keep choosing books that are too hard for them?
If a student continually chooses books that are way too hard for him/her, this should be a main focus during your individual reading conferences. This can be frustrating (I know!) but once students can actually start finding just right books that they are super excited about on their own, it will be totally worth it.
How do I introduce the classroom library to students?
Introducing the classroom library organization system is a perfect Day 1 reading mini-lesson. You can download the same PowerPoint presentation I use with my students for FREE HERE.
Do you recommend having a library check out system? How do you keep track of the books that are out of your library?
Nope. Too complex. Instead, you can set expectations around student book boxes or bags. If all students can have 2-3 classroom library books in their individual book box/bag, then you can visually see what is out of your library. If you have these plus a healthy desk cleaning (a.k.a. your teacher can check your desk at any time) routine, you can keep track of your books fairly easily. Plus, you’ll figure out the 2-3 kiddos who squirrel 20 books in their desk within the first few days. (Hint: their desks won’t shut.)
What books should I purchase for a 2nd or 3rd grade classroom library?
Series books work wonders in 2nd and 3rd grade! Try to read at least one of the books below as a class read aloud and tons of your students will want to continue the series. They’ll be in luck, as you’ll have more books from the series labeled with your name & genre all ready to go!
Humphrey the Hamster series
Magic Tree House series
The Boxcar Children series
Geronimo Stilton series
Who Was? Biographies series
Araminta Spookie series
You can find all of the recommendations above plus more 2nd and 3rd grade favorites in the Books for Your Classroom Library 2-3 Amazon Recommendation List. (affiliate link)
Want more classroom library resources?
If you want to purchase the classroom library resources I use in my own classroom, they are available at my online store.
If you are interested in purchasing the Classroom Library Organization Set that includes all the labels listed above in 4 and 9 labels to a page + editable book bin and genre book labels for you to customize for your own classroom + 1 page of personalized labels (the same one pictured above that includes all 7 graphics) + printable resources to go with the introductory PowerPoint you can find them in the Everything You Need to Organize Your Classroom Library set at the blog HERE or at TpT here.
If you want to purchase only the personalized labels, they are available HERE. This set includes 16 personalized label pages that read “From the Library of Mrs. Your Name Here” with 7 different graphics (in color and black and white) to choose from.
Please allow 24 hours from the time you submit your personalization information to receive your finished labels through email.

So, did you try it out? How did it go? Did creating labels in Word make you feel like a crazy person? Are there any genres you think I should add to my list? Tell me all about it in the comments.
Have a fab day Super Teacher and happy library organizing,
Thank you for sharing Katie!
I am in the process of working on organizing my classroom library.
Thanks for all your tips.
Cheryl 🙂
Thanks for your comment Cheryl! Good luck with your library organization!
K